Setting up in-app notifications
This guide will give you the information you need to enable notifications in your web application.
For the purposes of this guide, a skeleton React App along with the ChatKitty SDK will be used to set up in-app notifications. An example of this can be viewed here.
Anything developers build on ChatKitty needs to be associated with a ChatKitty project. If this is your first time creating a ChatKitty project, checkout our step-by-step getting started guide, which will walk you through creating your ChatKitty project.
Installing dependencies
In order to set up web in-app notifications, first add the needed dependencies to your project. This includes ChatKitty, and for this example, Bootstrap will be used for certain React UI components. However, Bootstrap is not necessary.
You can add both with the following command:
- npm
- Yarn
- pnpm
npm install react-bootstrap bootstrap @chatkitty/core
yarn add react-bootstrap bootstrap @chatkitty/core
pnpm add react-bootstrap bootstrap @chatkitty/core
Set up toast notifications with Bootstrap
First, let's set up toast notifications in your app. In src/app.js, add the following:
import logo from './logo.svg';
import './App.css';
import {useState} from 'react';
import {Button, Row, Col, Toast} from 'react-bootstrap';
import 'bootstrap/dist/css/bootstrap.min.css';

function App() {

  const [show, setShow] = useState(false);
  return (
    <div className="App">
        <Toast onClose={() => setShow(false)} show={show} delay={3000} autohide animation style={{
          position: 'absolute',
          top: 20,
          right: 20,
        }}>
          <Toast.Header>
            <img
              src="holder.js/20x20?text=%20"
              className="rounded mr-2"
              alt=""
            />
            <strong className="mr-auto">Notification</strong>
            <small>12 mins ago</small>
          </Toast.Header>
          <Toast.Body>There are some new updates that you might love!</Toast.Body>
        </Toast>
      <header className="App-header">
        <img src={logo} className="App-logo" alt="logo" />
        <Button onClick={() => setShow(true)}>Show Toast</Button>
      </header>
    </div>
Here, you have imported Toast from Bootstrap into app.js to create a toast notification in your web app. In order to check whether the toast notification works, click the "Show Toast" button. When the button is clicked, a test in-app notification appears that automatically hides after 3 seconds.
Now that a toast notification has been created, let's import ChatKitty in our app.
ChatKitty setup
First, create a chatkitty.js file in the src folder. Then, add the following:
import ChatKitty from '@chatkitty/core';

const chatkitty = ChatKitty.getInstance(/*your ChatKitty project's API key*/);

export default chatkitty;
To retrieve your API key, you can go to your ChatKitty application's Dashboard and select the appropriate project. Then, under "Application Info", copy your API key and paste it here.
Here, the getInstance method takes your ChatKitty project's API key and returns the ChatKitty object that you can use to obtain data about your application.
Setting up in-app web notifications using ChatKitty
To set up in-app notifications for your web application with ChatKitty, we must first import it into app.js. Add this to your imports in app.js:
import chatkitty from "./chatkitty.js"
Now that we have access to ChatKitty in our app.js file, let us set up the handler for when a user receives a notification .
To do so, add the following to app.js:
function App() {

  const [show, setShow] = useState(false);
  const [notification, setNotification] = useState({ title: '', body: '' });
  const [isTokenFound, setTokenFound] = useState(false);

  const initialize = async () => {
    const result = await chatkitty.startSession({ username: /* user's credentials */ });

    chatkitty.onNotificationReceived((notification) => {
        setNotification({ title: notification.title, body: notification.body })
        setShow(true);
    });

  }

  useEffect(() => {
    initialize().then();
  }, [])

  const onShowNotificationClicked = () => {
    setNotification({ title: "Notification", body: "This is a test notification" })
    setShow(true);
  }

  return (
    <div className="App">
      <Toast onClose={() => setShow(false)} show={show} delay={3000} autohide animation style={{
        position: 'absolute',
        top: 20,
        right: 20,
        minWidth: 200
      }}>
        <Toast.Header>
          <img
            src="holder.js/20x20?text=%20"
            className="rounded mr-2"
            alt=""
          />
          <strong className="mr-auto">{notification.title}</strong>
          <small> just now</small>
        </Toast.Header>
        <Toast.Body>{notification.body}</Toast.Body>
      </Toast>
      <header className="App-header">
        {isTokenFound}
        {!isTokenFound}
        <img src={logo} className="App-logo" alt="logo" />
        <Button onClick={() => onShowNotificationClicked()}>Show Toast</Button>
      </header>

    </div>
  );
}
Here, you have enabled a user to receive in app notifications when they are active on ChatKitty using the ChatKitty object returned from the getInstance method in chatkitty.js.
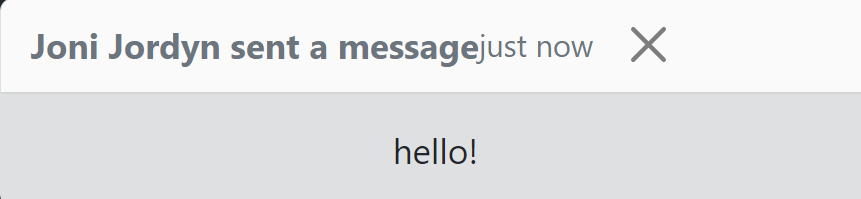
Testing in-app web notifications
Now, you can test whether a user is receiving in-app notifications when using your web app. To do so, send a message to the user and you should see a toast notification in your app that looks like this: